

How To Initialize A Register To 100 Lc-3
BIOS Beep Codes for Troubleshooting
In this article, we collected the most widespread BIOS signals (beepcodes) used for troubleshooting in instance of any PC issues. Yet if your figurer gives a sound indicate which is not listed below, consult the motherboard / PC user manual to identify what kind of hardware error it is.
The Post (ability-on self-test) feature checks the computer'south internal hardware to ensure compatibility and connectedness before the actual boot occurs. If the computer boots properly, it may give one audio signal (some computers are supposed to give it twice) as it starts and continues to kicking. However, if the computer breaks down, it will either give no signal at all or give a special betoken indicating a sure trouble.
AMI BIOS signals
AMI BIOS signals (or beep codes) are given below. Still, beep codes may differ due to a big diversity of manufacturers who produce computers with this blazon of BIOS.
Sound indicate (beep code) — Clarification
- 1 short beep No errors detected, normal kick
- 2 short beeps Parity circuit failure
- 3 shot beeps Base 64 One thousand RAM failure (The first 64 KB of RAM are out of club)
- 4 short beeps Organisation timer failure
- five short beeps Process failure
- 6 short beeps Keyboard controller Gate A20 fault
- 7 short beeps Virtual mode exception error (Arrangement board issue)
- 8 short beeps Brandish memory Read/Write examination failure (VRAM error)
- nine curt beeps ROM BIOS checksum failure
- 10 brusk beeps CMOS shutdown Read/Write error
- eleven short beeps Cache Memory error
- 1 long beep, 3 short beeps Conventional/Extended memory failure (Graphics carte is out of order)
- i long beep, 8 short beeps Display/Retrace exam failed
- Two-tone siren Low CPU Fan speed, Voltage Level issue.
AWARD BIOS signals
Below, we listed AWARD BIOS signals (beep codes). As well equally in the previous case, beep codes may differ due to a big variety of manufacturers who produce computers with this type of BIOS.
Sound signal (beep code) Description
- i long beep, 2 short beeps — Indicates a video error has occurred and the BIOS cannot initialize the video screen to display whatever additional information. (Graphics carte du jour not plant, or VRAM error)
- 1 long beep, 3 brusque beeps — Video card not detected (reseat video carte) or bad video menu (Depending on the BIOS version, this beep code may bespeak either a graphics carte error or a keyboard error)
- Endlessly repeated signal — RAM problem.
- Repeated frequent beeps while the estimator is working — Overheating processor (CPU)
- Repeated beeps, frequent and seldom — Issue with the processor (CPU), perchance damaged
If there are whatever other hardware problems, BIOS volition show you a corresponding message.
Dell signals
Audio signal (beep lawmaking) — Description
- 1 beep — BIOS ROM abuse or failure
- ii beep — Memory (RAM) non detected
- three beep — Motherboard failure
- 4 beep — Retentiveness (RAM) failure
- 5 beep — CMOS Battery failure
- six beep — Video menu failure
- 7 beep — Bad processor (CPU
IBM BIOS signals
Now, here are some IBM BIOS signals.
Sound signal (beep code) — Description
- None — No Power, Loose Card, or Short (Ability supply unit, motherboard or internal speaker is out of guild)
- i short beep — Normal POST, computer is ok. (No errors detected)
- ii brusk beeps — POST error, review screen for error code.
- Continuous beeps — No Ability, Loose Card, or Brusk. (No power supply)
- Repeated short beep — No Power, Loose Card, or Short. (No power supply)
- 1 long beep, 1 short beep — Motherboard issue.
- 1 long beep, 2 brusk beeps — Video (Mono/CGA Display Circuitry) issue.
- 1 long beep, 3 brusk beeps — Video (EGA) Display Circuitry.
- 3 long beeps — Keyboard or Keyboard carte du jour mistake.
- 1 beep and black screen — Video Display Circuitry. (The monitor doesn't piece of work)
Phoenix BIOS signals
Below, we listed Phoenix BIOS Q3.07 OR 4.X signals (beep codes).
Sound bespeak (beep lawmaking) Description
- one-1-one-one Unconfirmed beep lawmaking. Reseat RAM chips or replace RAM chips as possible solution
- 1-1-ane-three Verify Existent Mode.
- 1-1-2-one Get CPU Type.
- 1-1-2-3 Initialize system hardware.
- i-ane-3-1 Initialize chipset registers with initial POST values.
- 1-1-iii-ii Gear up in POST flag.
- i-1-3-three Initialize CPU registers.
- 1-one-4-1 Initialize cache to initial Postal service values.
- 1-1-4-3 Initialize I/O.
- one-2-one-ane Initialize Ability Management.
- i-2-1-2 Load alternate registers with initial POST values.
- 1-2-one-three Jump to UserPatch0.
- 1-2-ii-1 Initialize keyboard controller.
- i-2-two-3 BIOS ROM checksum.
- 1-2-iii-1 8254 timer initialization.
- ane-two-3-3 8237 DMA controller initialization.
- ane-2-4-one Reset Programmable Interrupt Controller.
- 1-3-one-i Test DRAM refresh.
- 1-3-1-3 Examination 8742 Keyboard Controller.
- 1-3-2-1 Gear up ES segment to register to four GB.
- 1-three-3-ane 28 Autosize DRAM.
- ane-iii-3-3 Clear 512 K base RAM.
- 1-3-four-one Test 512 base address lines.
- 1-three-4-three Examination 512 K base retentiveness
- 1-4-1-three Test CPU bus-clock frequency.
- 1-four-ii-4 Reinitialize the chipset.
- 1-iv-3-1 Shadow system BIOS ROM.
- i-4-3-2 Reinitialize the cache.
- 1-4-3-3 Autosize enshroud.
- 1-4-4-1 Configure advanced chipset registers.
- 1-iv-four-2 Load alternate registers with CMOS values.
- 2-i-1-one Set Initial CPU speed.
- 2-1-1-3 Initialize interrupt vectors.
- 2-1-2-1 Initialize BIOS interrupts.
- 2-1-2-3 Check ROM Copyright find.
- ii-1-2-iv Initialize manager for PCI Options ROMs.
- 2-1-iii-i Bank check video configuration against CMOS.
- ii-1-three-2 Initialize PCI bus and devices.
- 2-1-3-three Initialize all video adapters in arrangement.
- two-1-4-ane Shadow video BIOS ROM.
- two-1-4-3 Display Copyright detect.
- 2-ii-i-1 Brandish CPU Blazon and speed.
- 2-two-1-3 Test keyboard.
- 2-2-ii-1 Prepare cardinal click if enabled.
- ii-2-two-3 56 Enable keyboard.
- 2-2-3-1 Test for unexpected interrupts.
- 2-two-3-3 Brandish prompt Press F2 to enter SETUP.
- 2-two-iv-1 Test RAM betwixt 512 and 640 k.
- two-three-one-i Test expanded memory.
- two-3-1-3 Test extended retentivity address lines. (Test extended retention address lines).
- 2-iii-2-1 Jump to UserPatch1. (Bound to UserPatch1).
- two-3-2-3 Configure advanced enshroud registers.
- 2-three-3-i Enable external and CPU caches.
- 2-3-3-three Display external cache size
- 2-3-4-1 Display shadow message.
- 2-3-4-3 Display not-disposable segments.
- 2-4-ane-ane Display fault letters.
- 2-iv-1-3 Check for configuration errors.
- two-4-2-1 Test real-time clock.
- 2-4-2-3 Cheque for keyboard errors
- 2-iv-4-i Set up hardware interrupts vectors.
- 2-4-iv-3 Examination coprocessor if present.
- 3-i-1-i Disable onboard I/O ports.
- 3-1-ane-3 Observe and install external RS232 ports.
- three-1-2-one Notice and install external parallel ports.
- three-one-2-3 Re-initialize onboard I/O ports.
- 3-one-3-1 Initialize BIOS Data Expanse.
- three-1-3-three Initialize Extended BIOS Information Surface area.
- 3-one-iv-i Initialize floppy controller.
- 3-two-1-1 Initialize hard disk drive controller.
- 3-2-1-2 Initialize local motorbus hard disk controller.
- 3-2-1-iii Jump to UserPatch2
- 3-2-2-1 Disable A20 address line.
- 3-2-2-3 Clear huge ES segment register.
- 3-2-3-1 Search for option ROMs.
- 3-2-3-3 Shadow option ROMs.
- iii-2-4-1 Set Power Management.
- 3-ii-four-3 Enable hardware interrupts.
- 3-iii-one-i Fix time of mean solar day.
- 3-three-1-3 Check central lock.
- 3-3-3-1 Erase F2 prompt.
- iii-3-3-3 Browse for F2 key stroke.
- three-iii-iv-ane Enter SETUP.
- three-3-4-3 Articulate in POST flag.
- iii-4-one-1 Erase F2 prompt.
- 3-iv-1-3 POST done, prepare to boot operating system.
- 3-four-2-3 Bank check password (optional).
- iii-4-3-1 Articulate global descriptor table.
- 3-4-4-one Clear parity checkers.
- 3-4-4-iii Articulate screen (optional).
- three-4-four-iv Check virus and fill-in reminders.
- 4-1-one-ane Try to boot with INT nineteen.
- 4-2-1-1 Interrupt handler error.
- 4-2-1-3 Unknown interrupt error.
- 4-two-2-i Pending interrupt fault.
- 4-2-2-iii Initialize option ROM error.
- four-ii-iii-1 Shutdown error.
- four-2-three-3 Extended Block Motility.
- 4-2-4-1 Shutdown 10 error.
- four-3-i-iii Initialize the chipset.
- 4-3-i-4 Initialize refresh counter.
- 4-3-2-ane Check for Forced Flash.
- four-3-two-2 Check HW status of ROM.
- iv-iii-2-3 BIOS ROM is OK.
- 4-three-2-4 Do a consummate RAM test.
- 4-3-3-1 Practise OEM initialization.
- four-3-3-2 Initialize interrupt controller.
- four-3-3-3 Read in bootstrap code.
- 4-3-3-four Initialize all vectors.
- 4-3-iv-1 Kick the Flash program.
- 4-3-4-2 Initialize the kick device.
- 4-iii-4-iii Kick lawmaking was read OK.
Resetting BIOS to default settings
The easiest mode to reset BIOS is from its carte du jour. To access this menu, restart the computer and press the defended primal that appears on the screen when the computer is booting; in most cases, it's either Delete or F2.

When in BIOS, look for a setting with the name like Reset to default, Load factory defaults, Clear BIOS settings, Load setup defaults. Use arrow keys to select it, and press the Enter key to ostend this action. At present BIOS volition utilise default settings.

One more way to reset BIOs is to take out the battery located on the calculator's motherboard.
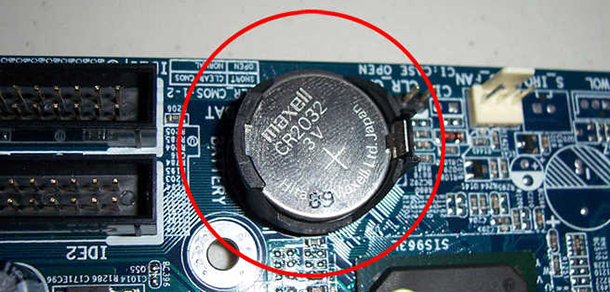
Starting time of all, make sure the estimator is powered off. Detect a round flat bombardment on the motherboard and remove it advisedly. Place it back afterward 5 minutes. This elementary activeness will reset BIOS settings to default.
Installing new hardware
Sometimes, BIOS has to exist updated so that it tin can support a piece of new hardware, for example, a more powerful CPU. You can come across how it is washed by watching a video in our YouTube aqueduct.
See the full article with all additional video tutorials.

Source: https://habr.com/en/company/hetmansoftware/blog/548204/
Posted by: lopezdecul1995.blogspot.com
0 Response to "How To Initialize A Register To 100 Lc-3"
Post a Comment